Welcome to My Blog! 🌟
Before we dive into the content, I’d love for you to join me on my social media platforms. It’s where I share more insights, engage with our vibrant community, and post regular updates. Here’s how you can stay connected:
📘 Facebook: Connect with me on Facebook
Now, let’s embark on this journey together. I hope you find the content here insightful, engaging, and most importantly, valuable. Let’s explore, learn, and grow together! 🚀
Table of Contents
Introduction
A2 tool steel is one of the most widely used tool steels in manufacturing due to its excellent toughness and wear resistance. The yield strength of A2 tool steel is a critical mechanical property that defines the stress level at which the material begins to deform plastically. Understanding how to accurately test A2 tool steel yield strength is essential for engineers, metallurgists, and quality control professionals to ensure that tools made from this steel meet required performance standards.
In this comprehensive guide, we will discuss 12 must-know tips for testing the a2 tool steel yield strength, covering everything from preparation to interpretation of results. Whether you are working in a lab setting or a production environment, these tips will help you obtain reliable and accurate measurements.
Why Testing A2 Tool Steel Yield Strength Matters
Yield strength is a fundamental property influencing the durability and lifespan of tools manufactured from A2 steel. Incorrect or inconsistent testing can lead to subpar products that may fail under stress, causing costly downtime or safety hazards. By mastering proper testing techniques, you can verify that your steel components conform to engineering specifications and perform optimally in real-world applications.
Tip 1: Know the Chemical Composition and Heat Treatment of Your A2 Tool Steel
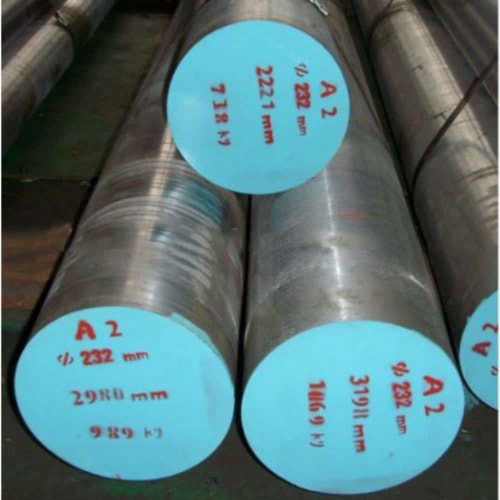
The a2 tool steel yield strength is not a fixed number but a variable property heavily influenced by the steel’s chemical composition and heat treatment history. A2 tool steel is classified as an air-hardening, cold work tool steel, prized for its excellent combination of toughness and wear resistance. Its chemical composition typically includes approximately 1.0% carbon, 5% chromium, and small amounts of manganese, molybdenum, and vanadium. Each element plays a key role:
- Carbon (C): Provides hardness and strength by forming carbides.
- Chromium (Cr): Enhances hardenability, corrosion resistance, and wear resistance.
- Molybdenum (Mo) and Vanadium (V): Improve toughness and refine the grain structure.
The heat treatment process profoundly impacts the yield strength. Typical steps include:
- Austenitizing: Heating the steel to a high temperature (usually around 1020-1040°C) to transform its microstructure.
- Quenching: Cooling the steel rapidly, usually in air, to form a hard martensitic structure.
- Tempering: Reheating to a lower temperature to relieve stresses and enhance toughness without significant loss of hardness.
Variations in these parameters, such as quench temperature and tempering duration, can shift the yield strength by hundreds of MPa. For instance, higher tempering temperatures usually reduce yield strength but increase ductility.
Best Practice: Always keep detailed records of the chemical batch analysis and exact heat treatment parameters for every lot of A2 tool steel you test. This information is crucial for correlating test results to specific material conditions and ensuring consistency.
Tip 2: Prepare Test Samples According to Standards
Accurate testing of a2 tool steel yield strength begins with proper sample preparation. The shape, size, and surface condition of the test specimen can dramatically affect the results. Here are essential considerations:
- Follow ASTM E8/E8M standards: These standards specify the dimensions and shapes of tensile test specimens, including gauge length and cross-sectional area, to ensure uniformity and comparability of results.
- Avoid machining defects: The specimen must be free from cracks, burrs, or surface irregularities introduced during cutting or grinding. Such defects can create stress concentration points that cause premature failure or skewed yield strength measurements.
- Minimize residual stresses: Residual stresses introduced during machining or handling can affect yield strength. Stress-relief processes like low-temperature annealing or careful polishing can help reduce these effects.
- Surface finish: A smooth, polished surface reduces the risk of micro-cracks initiating during testing, which can lead to erroneous early yielding or failure.
- Sample orientation: For anisotropic materials or components with directional properties, testing samples cut in different orientations (longitudinal, transverse) is advised to understand yield strength variability.
Summary: Proper specimen preparation ensures that the measured yield strength truly reflects the material’s intrinsic properties rather than artifacts of the testing process.
Tip 3: Use Appropriate Testing Equipment Calibrated for Tool Steel
Selecting the right testing machine and ensuring it is calibrated correctly is essential to measure the a2 tool steel yield strength precisely.
- Tensile testing machines with appropriate load capacities (usually above 100 kN) are recommended.
- Use extensometers or strain gauges that are compatible with hard tool steels to detect yield points.
- Regular calibration of equipment as per ISO or ASTM standards guarantees accuracy.
Without proper equipment, your yield strength values may be misleading.
Tip 4: Control Testing Parameters for Consistency
Testing parameters such as strain rate, temperature, and alignment affect the measured yield strength of A2 steel.
- Conduct tests at room temperature unless the application requires otherwise.
- Maintain a consistent strain rate as per standards, typically 0.005 to 0.05 mm/mm/min for tool steels.
- Align the specimen correctly in the machine to avoid bending stresses.
Control over these parameters reduces variability and improves reproducibility of results.
Tip 5: Interpret Yield Strength Results with Context
The a2 tool steel yield strength is usually reported as the stress at which permanent deformation begins. However, interpreting these results requires understanding the steel’s condition.
- Compare yield strength against manufacturer datasheets or standards.
- Take note of any anomalies such as early yielding or necking.
- Consider correlating yield strength with other mechanical properties like hardness and tensile strength.
Accurate interpretation informs better material selection and quality control decisions.
Mid-Article Table: Typical Yield Strength Values for A2 Tool Steel under Various Heat Treatments
| Heat Treatment | Hardness (HRC) | Approximate Yield Strength (MPa) | Comments |
|---|---|---|---|
| Annealed | 30 | 650 | Softest condition for machining |
| Oil Quenched + Temper | 56 | 1800 | Common heat treatment for tooling |
| Air Hardened + Temper | 58 | 1950 | Maximum hardness with good toughness |
| Double Tempered | 60 | 2100 | Highest strength but reduced toughness |
This table helps illustrate how heat treatment influences the a2 tool steel yield strength, enabling informed decisions about testing conditions and expected outcomes.
Tip 6: Perform Multiple Tests to Ensure Reliability
When assessing the a2 tool steel yield strength, relying on a single test result can be misleading due to natural material variability and testing conditions. To accurately determine the a2 tool steel yield strength, it’s critical to perform multiple tensile tests on specimens sampled from different batches, production lots, or various sections of the same batch.
Statistical analysis methods such as calculating the mean, median, and standard deviation of the measured a2 tool steel yield strength values help provide a more reliable and representative picture of the material’s true performance. These statistics reduce the impact of anomalies or random variations.
Outliers or unexpected results in your a2 tool steel yield strength data set should be carefully investigated. Possible causes include testing errors, specimen preparation flaws, or non-uniform microstructures in the steel. Identifying and eliminating these outliers ensures your overall dataset remains valid and trustworthy.
By compiling multiple data points, you increase confidence in your conclusions about the a2 tool steel yield strength and its suitability for your specific applications. This approach is especially important for critical engineering applications where consistent mechanical performance is essential.
Tip 7: Consider the Effect of Microstructure on Yield Strength
Microstructural features like grain size, carbides, and retained austenite affect yield strength.
- Use microscopy to analyze the steel’s microstructure after heat treatment.
- Finer grains generally increase yield strength by impeding dislocation movement.
- Excessive carbide precipitation might reduce toughness despite high strength.
Testing yield strength alongside microstructural evaluation offers a more comprehensive understanding.
Tip 8: Utilize Advanced Testing Methods When Needed
Besides standard tensile testing, advanced methods like nanoindentation or hardness-to-strength correlation can assist in yield strength estimation.
- Nanoindentation can measure localized mechanical properties on small sections.
- Hardness testing provides a rapid, indirect estimate of yield strength.
These methods complement traditional testing, especially when sample size or geometry is limited.
Tip 9: Document All Testing Conditions and Results Thoroughly
Complete and clear documentation ensures traceability and repeatability.
- Record specimen details, machine settings, environmental conditions, and operator information.
- Store raw data and processed results securely for future reference.
Good documentation supports quality assurance and continuous improvement in yield strength testing.
Tip 10: Understand the Limitations of Yield Strength Testing for A2 Tool Steel
Yield strength testing provides valuable data but has limitations.
- It may not fully capture the steel’s behavior under cyclic loads or impact.
- Complementary tests like fatigue or impact toughness testing should be performed for comprehensive material characterization.
Knowing these limits helps avoid over-reliance on a single property.
Tip 11: Train Personnel Properly for Accurate Testing
Human factors can affect test outcomes.
- Ensure operators are trained on the specific requirements of testing a2 tool steel yield strength.
- Conduct regular refresher courses and proficiency assessments.
Skilled personnel reduce errors and variability.
Tip 12: Apply Results to Real-World Applications
Ultimately, the purpose of testing is to ensure your tools meet performance requirements.
- Use yield strength data to optimize design safety factors.
- Inform maintenance schedules and replacement criteria based on material limits.
Translating test results into practical applications maximizes the value of your testing program.
Conclusion
Testing the a2 tool steel yield strength accurately is vital for producing reliable, high-performance tools. By following these 12 tips—from understanding material composition to interpreting results—you can achieve consistent, trustworthy measurements that enhance product quality and safety. Remember to standardize your processes, maintain equipment, and train staff to ensure optimal testing outcomes.
FAQ
Q1: What is the typical range of a2 tool steel yield strength?
A: It varies between 650 MPa (annealed) to over 2100 MPa (heat treated), depending on the condition and treatment.
Q2: Can hardness testing replace yield strength testing?
A: Hardness testing provides an estimate but cannot fully replace tensile testing for yield strength accuracy.
Q3: How often should testing equipment be calibrated?
A: Calibration should follow manufacturer recommendations or at least annually to maintain accuracy.
Q4: Does the testing temperature affect a2 tool steel yield strength?
A: Yes, yield strength typically decreases at elevated temperatures; most tests are conducted at room temperature.
Q5: Can small sample sizes affect test results?
A: Yes, small or improperly prepared samples can produce inaccurate results due to size effects and surface flaws.